This is a bit advanced guide. Arduino 3V Motor Control Level I Advanced Speed Variation is Second Hard Level Guide Where Diode, Transistor and Resister Has Been Used. We have the first guide – Arduino Basic 3V Motor Control. If you open your Arduino GUI application, under Tools dropdown menu, you will get “Serial Monitor” as option. We will use that Serial Monitor Window to input an arbitrary value from 0 to 255 and hit return key to give Arduino the signal that we need that value’s speed. Zero means stop. Here is a video of the end result, it is basically a screencast. It is showing an attached camera monitoring the motor in my hand (with cigarette packet’s part as fake blade) and on the Serial Monitor, I am changing the value :
Around the value of 63, there is braking like action for the given load to the motor. If it was a robotic wheel, I had to adjust this value of 63 to as closer to zero as possible. Instead of 0 to 255 points, I could use 0 to 190 for near perfect braking action and stop. With good amount of load, 0 to 255 will towards 0 to 100.
Level I Advanced Arduino 3V Motor Control : Things You Need and Must Know
This is actually not perfect way for 3V motor control, this is usually for who can never move their 3V motor digitally. We are providing 100% warranty that this guide will help you to control the rotational speed for any 3V DC Motor.
---
You should have a 3V DC motor, an Arduino UNO board, few Jumper Wires, a breadboard, a multimeter, a transistor (we used 2N 2222 in the video, any general purpose transistor will work), a diode (you can use a LED if you do not have diode) and as 220 Ohm resister. You can add another resistor as pull down resister of 10K Ohm value to the GND before it enters the Arduino board.
Other websites will say to buy specific numbered transistor (or force to buy TIPS) and diode. For so much basic work, nothing specific needed. Arduino is not hugely popular among the real embedded enthusiast and experts for many reasons, many websites took that advantage and made money.
Arduino 3V Motor Control : Circuit and Code
Third pin has a ~ sign, that means it can perform both analog and digital stuffs.
Here is the Circuit, we have marked the points where you should check using a multimeter :
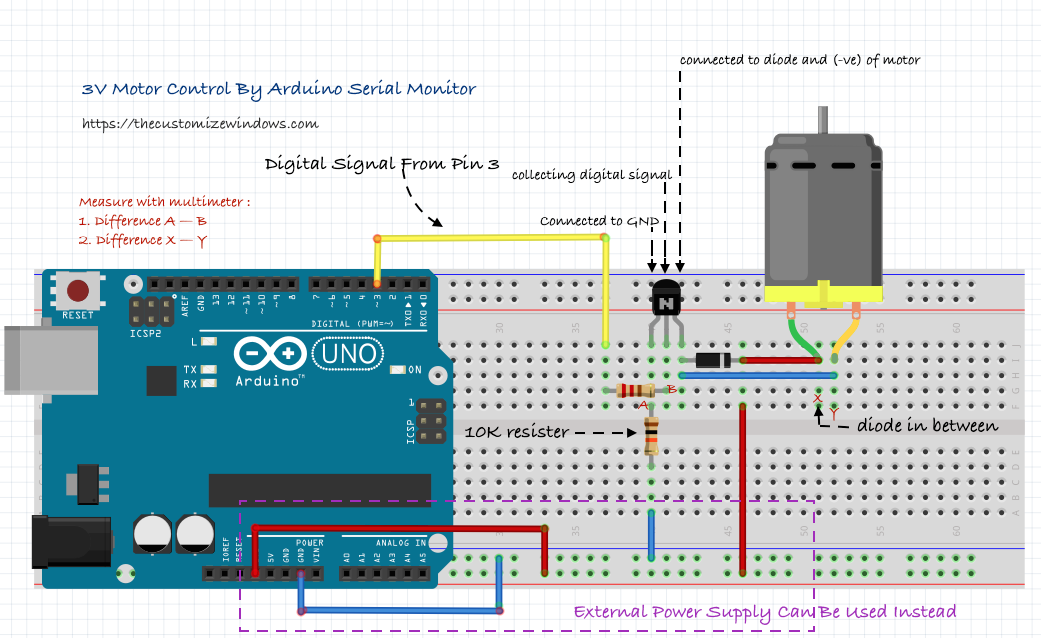
Look at the diagram to understand what is happening. We are applying 3.3V from Arduino board – that is external power supply for the motor. That electricity can not back flow towards the transistor as we have added a diode – diode is like oneway valve plus there is a 10K Ohm pull down resister.
We have project on Fritzing for this Arduino 3V Motor Control. You can download the circuit diagram and code from there ( read the instruction there before downloading ). The code was shared on Adafruit.
Here is code too :
1 2 3 4 5 6 7 8 9 10 11 12 13 14 15 16 17 18 19 20 21 | int motorPin = 3; void setup() { pinMode(motorPin, OUTPUT); Serial.begin(9600); while (! Serial); Serial.println("Input For Speed Control a Value 0 to 255 and Hit Enter Key"); } void loop() { if (Serial.available()) { int speed = Serial.parseInt(); if (speed >= 0 && speed <= 255) { analogWrite(motorPin, speed); } } } |
Unidirectional speed but we made it to vary. We are explaining the coding part –
int motorPin = 3 – initialize a thing named motorPin at digital 3rd pin.void setup() – dear microprocessor, first read this instruction for this setup.pinMode(motorPin, OUTPUT) – the defined motorPin thing is the output.
Serial.begin(9600) – begin to process from Serial Monitor at 9600 baud.while (! Serial) – condition.Serial.println("Input ... Key") – Print “Input For Speed Control a Value 0 to 255 and Hit Enter Key” in the Serial Monitor.void loop() – dear microprocessor, read this instruction for this setup to repeat.if (Serial.available()) – check whether Serial Monitor is available.int speed = Serial.parseInt() – get the speed what the human gives as input in Serial Monitor.
if (speed >= 0 && speed <= 255) - if the human gives a value as input in Serial Monitor between 0 to 255 then do the next action else do nothing.analogWrite(motorPin, speed) - send current if the condition is true for the thing named motorPin at digital 3rd pin.
Arduino Advanced 3V Motor Control : Steps and Tips
Obviously you know how to create the circuit and how to upload the code. Do not connect the motor first - instead add multimeter there to measure the voltage output. The output will be like - 3.21 to 1.50 depending your input value via Serial Monitor, now add the motor.
3V Motor may not rotate due to need of higher frequency or some extra power to overcome the inertia. For that reason, in the video we have gave the motor a higher spin first then lowered the value - kind of first gear!
There will be back flow of 0.01V electricity towards the Arduino board - measure with multimeter. We nulled it with a 10K Ohm resister.
Arduino Advanced 3V Motor Control : Whats Next?
It is great that you can do it. But you should work with the code. Change the coding part and try to start with input value and slowdown to x value after y seconds.
So, that small part of the breadboard is a small circuit with 3 inputs and 2 outputs. You can actually make it a 1" x 1" PCB as basic motor controller.
Tagged With 3v motor controller , control motor 3v arduino , 3v electric motor control speed arduino , pinMode(motorPin OUTPUT); Serial being(9600); , https://yandex ru/clck/jsredir?from=yandex ru;search;web;;&text=&etext=1835 IbEp6TjxxUBL-vx9SE8e-r62rwBceAhD_aA-BGVAmV2xRMI2za4ja7F5nR0w7SfD 6d45344bb71f289c0602ad04c24549fd54969b86&uuid=&state=_BLhILn4SxNIvvL0W45KSic66uCIg23qh8iRG98qeIXme , controlador digital 3V DC , control 3v ckt by transistor , arduino motor diode , arduino electric motor 3v data sheet , 3v motor control